
What's up plamo nerds! Still recuperating from your weekend adventures I take it? I've been really productive myself. I'm about 80% through snapping up the Providence, and I made major headway on the workbench project. I'll be sharing everything in upcoming posts, but for now I'd like to focus on one particular element, which I've been keen on setting up since I moved into my new work area: A desk mounted regulator. Having the regulator and water trap assembly separate from the compressor has some nice advantages. Compressors are noisy - especially if you use one of those huge industrial types, but even the hobby grade mini compressors still make noise. I use a CMP-20T myself, and while it's pretty quiet it can still be heard from the next room - which in my case is the bedroom - and I'd rather not wake up my wife and son during a late night painting session. This setup allows me to keep the compressor in a sound-proofed compartment while still allowing easy air pressure adjustment. Here's a quick rundown of how to put it together.
Click on the Read More link for the rest of this post.
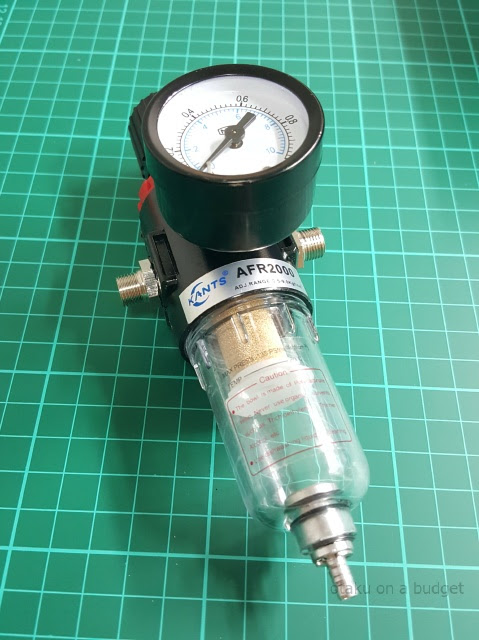
I got all the parts I needed for this project from Zee Hobby Shop: You'll need two air hoses, but I just ordered one since I already had another from my current setup, a pair of 1/4 to 1/8 connectors, and the regulator /water trap assembly. The regulator includes a mounting bracket in the box.


First, take some teflon tape / plumber's tape and wrap it around the treads of the connectors and the included gauge. You need these attachments to be air-tight for them to work properly.


Attach the parts to the main regulator body. The gauge goes in front, while the connectors go on the sides. The larger end of the connector screws into the regulator body so the standard 1/8 male ends can connect to the air hoses. Check the regulator for an arrow that indicates the direction of air flow.
Connect the air hoses accordingly and turn on you compressor. Turn the knob all the way down on the regulator to close the valve. Pull the water trap release on the bottom of the glass part if it does not go down by itself when the pressure starts to build up. Check for air leaks in all of the attachment points. If you find a leak, just unscrew the part, add more teflon tape, reattach and test again. Repeat until you can no longer hear a hiss from the outgoing hose and any of the attachments.

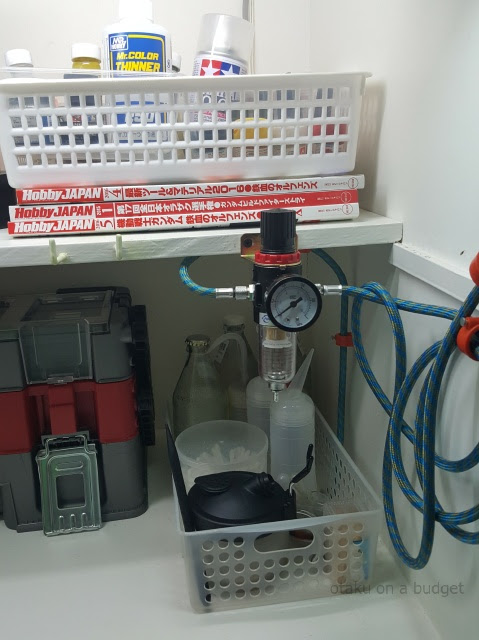
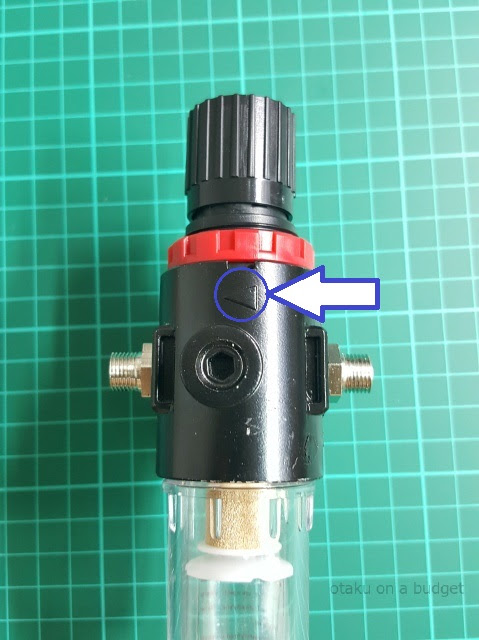
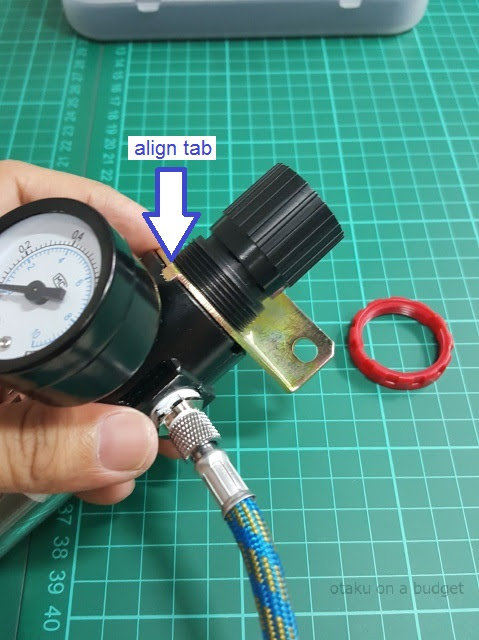
Once you've fixed all leaks, attach the mounting bracket. Screw off the red ring and put the mounting bracket in place, making sure the small tab aligns with the cut out on the regulator body. Screw the red bit back on, and mount the assembly with screws somewhere it is easy to reach. In my case the best spot was inside my cabinet on the first shelf so it's out of the way but still at an arms reach. Other good locations are on the desk itself or on your sparybooth if it's solid.


I drilled a hole down into the bottom cabinet to route the airhose from the compressor. Now my compressor can live out it's life in a semi-sound proofed compartment.


The sound-proofing is still a work in progress, but you get the idea. My old portable spraybooth is also kept in the same compartment, and I realized I could use the extractor fan in it to help keep the compressor cool. Yay!


Check out Zee Hobby Shop's extensive selection of airbrushing equipment if you're interested in building a similar setup!

That's all I have for now, but check back again soon for more work bench hacks. Until next time, keep building plamo!
Good ideas to mod my setup!
ReplyDelete